A classification is a list of categories, each with a code. Hoppa assigns every document one code from each classification. For example, a Type classification might assign D for drawings and T for text documents. See The Refinery.
Before you start
You need permission to edit the standard. See Refinery basics.
Open the Refinery and select the Classify tab. Classifications are listed on the left. Select one to see its categories on the right.
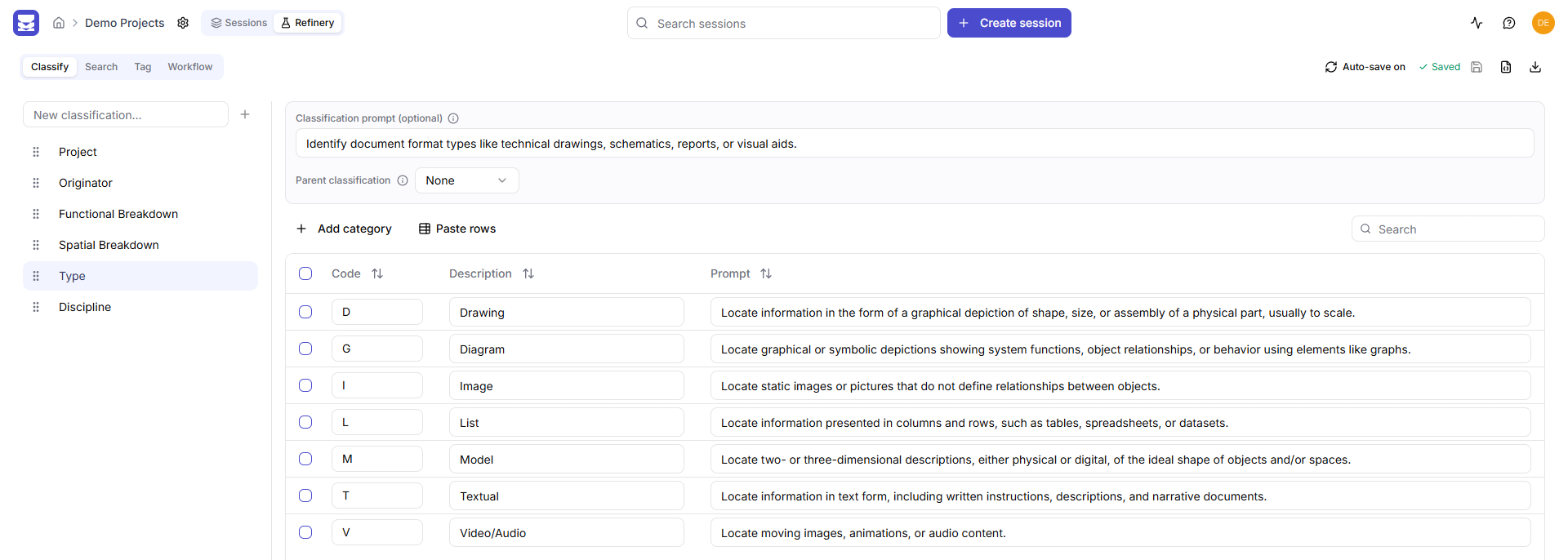
Refinery Classify tab showing the categories of a classification
Add a classification
- In the New classification... box, type a name.
- Press Enter, or select +.
Classification names must be unique. The new classification starts with one empty category.
To rename a classification, double-click its name, or hover over it and select the pencil icon. To delete one, hover over it and select the X, then confirm. Deleting a classification removes all its categories and cannot be undone.
Add categories
- Select the classification.
- Select Add category. A new empty row appears.
- Fill in the row:
- Code: the value Hoppa writes into the results, such as
DR. - Description: what the code means, such as Drawing.
- Prompt (optional): extra guidance for the AI on when to choose this code.
- Code: the value Hoppa writes into the results, such as
Press Enter in a Code cell to add another row straight away.
To delete categories, select their checkboxes and then select Delete. The categories are removed straight away, without a confirmation.
Codes must be unique
Each code can appear only once in a classification. Duplicate codes get a red border, and the Refinery shows Fix duplicate codes to save until you change them.
Guide the AI with a classification prompt
The Classification prompt (optional) box applies to the whole classification. Use it to tell Hoppa what to look for when choosing a code, for example Identify document format types like technical drawings, schematics, reports, or visual aids.
Prompts on individual categories work the same way, for that category only. Prompts are optional. Clear descriptions are often enough.
Paste categories from Excel
You can paste a list of categories from a spreadsheet instead of typing them.
- In your spreadsheet, arrange the columns in this order: Code, Description, Prompt. The Prompt column is optional.
- Copy the rows, without the header row.
- In the Refinery, select the classification and check that the toolbar shows Paste rows.
- Paste with Ctrl+V.
Hoppa adds a category for each row. Rows without a code are skipped. Rows whose code already exists are skipped too, and Hoppa tells you which ones.
To paste into a single cell instead, select Paste rows to switch to Paste cells.
Nest classifications
A classification can depend on an earlier one. For example, a Uniclass sub-group classification can depend on a group classification, so each sub-group belongs to one group.
- Select the classification that should depend on another.
- In Parent classification, choose the parent. Only classifications above it in the list can be parents.
- A Parent column appears in the categories table. For each category, choose the parent code it belongs to.
To set the parent code for many categories at once, select their checkboxes and then select Assign parent. Choose the Parent code and select Assign.
Nested classifications appear indented under their parent in the list.
Reorder classifications
Drag a classification by its handle, or hover over it and use the up and down arrows. A classification can only use parents that appear above it, so keep parents higher in the list.